You can use this element to create a feedback form for your site users. Once you drap the element into your site, you will be able to edit the text fields in the main section of the screen and customize it on the right-hand menu.
Sections
Text Properties
In the upper section of the right-hand menu, you will find all of the text formatting options that you would expect to see.
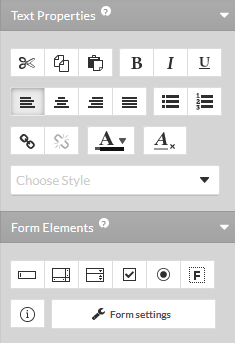
This includes:
- cut, copy and paste options
- bold, italic or underline
- text alignment
- sorted and unsorted lists
- links
- font color
- remove all formatting
Back to Top
Form Elements
This section contains all of the form field types that you can add to your form.
![]()
There are several different fields to choose from:
![]() Text Field
Text Field
- single line of text
![]() Text Area
Text Area
- multi-line text box
![]() Selection Field
Selection Field
- choose an option from the set list
![]() Checkbox
Checkbox
- add a checkbox field
![]() Radio Field
Radio Field
- toggle between options
![]() Feedback Form
Feedback Form
- this is merely a prefilled Text Area field with the label set for feedback
![]() Success/Failure notification
Success/Failure notification
- you can add an area where a notification will show if the form submit was successful or failed
Back to Top
Form Element Options
If you have a single field selected, you will see the options for that field only.
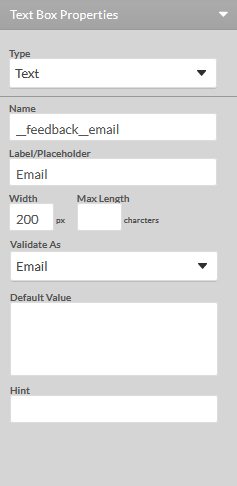
- Name
- the flag for the field
- used in the template used to send email to your email account
- Label
- this is the text that shows in the field before anything is added
- typically this would be an example of what you would expect in this field
- this is not the same as default value, if a default value is set, this will not be shown
- Size
- edit the size of your form field
- you can also set a max lenght in characters
- Validate As
- you can limit entries to this field based on a certain pattern
- patterns include:
- None
- Not Empty (field must not be blank)
- Email (must contain a valid email address)
- Letter (must be all letters, no numbers or special characters)
- Number (must contain only digits)
- Phone (requires a phone number format)
- Date (adds a calander for choosing a date)
- Regular Expression (see this wikipedia page for more information on regular expressions)
- Default Value
- this will be entered in the field by default, but can be edited by the user
- this will replace the Label if not blank
- Hint
- you can add a hint or explaination to the field that will show up when your users hover their mouse over the field
Back to Top
Form Settings
In this section, you will set up what happens when a user submits a form.
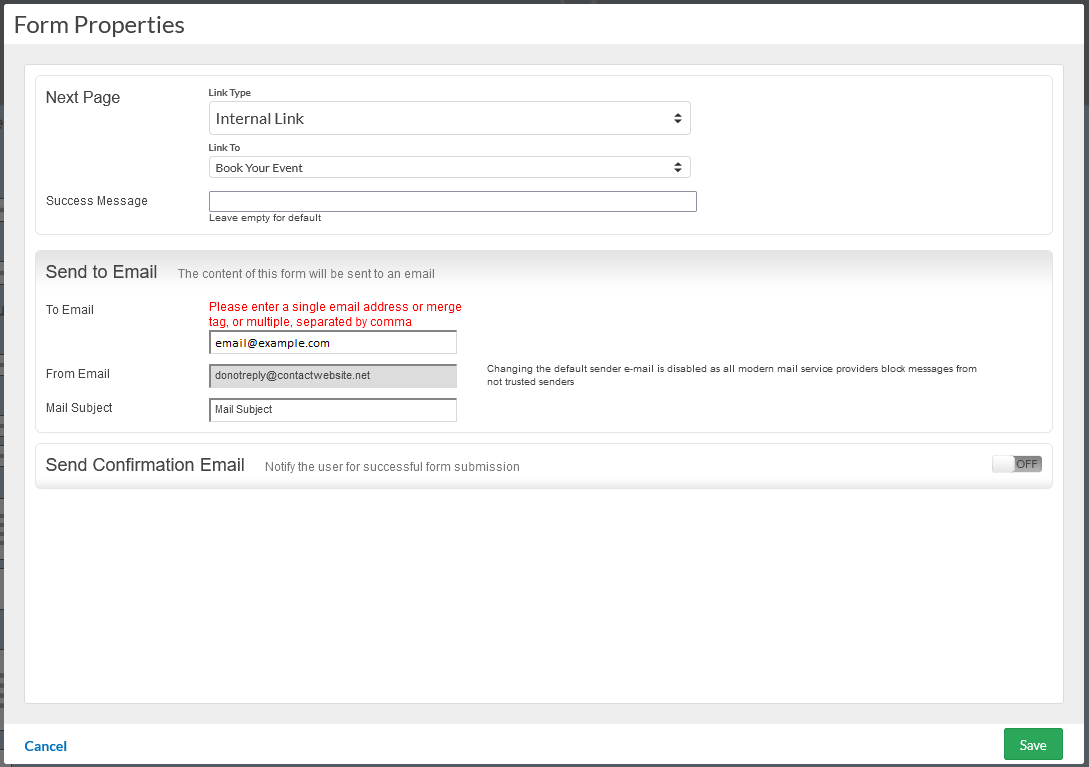
This window is divided into three sections:
Next Page
This section allows you to set the page that the user will be taken to once the form is submitted.
- Link Type
- choose whether your user will stay on the current page, or choose to direct them to another page on your site
- Scroll to form on submit
- this will scroll the screen down to the form once the page reloads after the form is submitted
- Success Message
- displayed if the form was submitted successfully
Send to Email
Now, you will need to enter the email address that you wish these emails to be sent to. Your account email address will be populated by default, but it is recommended that you create a new email address for your form entries.
You can check out our guide on creating a new email address. You cannot use Plus Addressing with this service.
- To Email
- you can enter the target email address here
- multiple addresses can be entered, separated by a comma
- From Email
- this is the address that will send your form entries
- to reduce the risk of spam flagging, this cannot be updated
- Mail Subject
- enter what you wish the subject for the emails to be
- this can assist with mail filtering
Send Confirmation Email
While disabled by default, you can set a notification to be sent to your user when a form has been submitted.
- To Email
- here you will select the form field that will be used to send the notification
- choose the field from the drop down menu
- From Email
- this is the address that will send your form entries
- to reduce the risk of spam flagging, this cannot be updated
- Mail Subject
- enter what you wish the subject for the emails to be
- should be descriptive to stand out from spam
- should include your domain or business
- Mail Format
- choose wheter your emails will be plain text or html
- Template
- here you will create the body of the email
- you will have all of the base text options available
- you can add the information from the fields that the user entered using the Merge Tags box
Once you are happy with the options, be sure to click on the Save button to save your updates.
Back to Top
Still Having Issues?
If you are still having issues, you can contact our Customer Support in the following methods:
Live Chat
You can connect to our Live Chat Support Team from your MacHighway Client Area. If you are not sure how to do this, you can find a guide here.
Our Live Chat team is available Monday to Friday from 9:00 AM to 7:00 PM Eastern Time.
Support Ticket
You can submit a support ticket to our Support Team from your client area.
Our ticket Support Team is available 24/7/365.
Phone support
You can contact our Phone Support Team using the following number:
- US/Canada 1-888-974-0334
- International 1-727-800-3606
Our Phone Support team is available Monday to Friday from 9:00 AM to 7:00 PM Eastern Time.
